Introduction
UTM parameters play a vital role in tracking and analyzing the effectiveness of your marketing campaigns. By capturing these parameters and utilizing them intelligently, you can gain valuable insights into your audience’s behavior and optimize your marketing efforts accordingly. In this blog post, we will explore how to transfer UTM parameters from a cookie into an Elementor form field. By implementing this technique, we can create a cookie with UTM parameters in it and track it with Google Tag Manager to make sure your attribution model continues even after a prospect clicks away from your ad.
Understanding UTM Parameters
Before we delve into the technical details, let’s briefly recap what UTM parameters are. UTM (Urchin Tracking Module) parameters are tags added to a URL that allow you to track and identify specific sources, mediums, campaigns, and other parameters associated with your website traffic. Common UTM parameters include utm_source, utm_medium, and utm_campaign and for Google Ad campaigns, that sweet sweet gclid. These parameters are typically appended to the URL when users click on your marketing links.
The Challenge
When a user lands on your website through a marketing campaign, the UTM parameters are only kept in the URL of the prospects browser. If they click away, we now lose that attribution model and can no longer track it to implement into a form field if they want to come back later. To combat this, we create a cookie that stores the UTM parameters, which then is inputted into the form field if a user clicks away to another page on your site, or closes their browser completely.
Step 1: Create A Form Field
The first step to capture UTM parameters in Elementor Forms, is to create a hidden form field that we can input the UTM parameters into. For this example, we are going to be using only the “gclid” parameter.

Make sure you give it the correct label and ID shown above in this photo as we are going to reference this later.
Step 2: Install Google Tag Manager
We are going to be using Google Tag Manager for this tutorial. Make sure you have that installed onto your WordPress website. I have mine installed using the “Custom Code” feature in Elementor. Make sure you add your code snippets from Google Tag Manager into both your header and also your body. Here’s an example of what mine looks like below.

Step 3: Convert UTM Parameters Into A Cookie
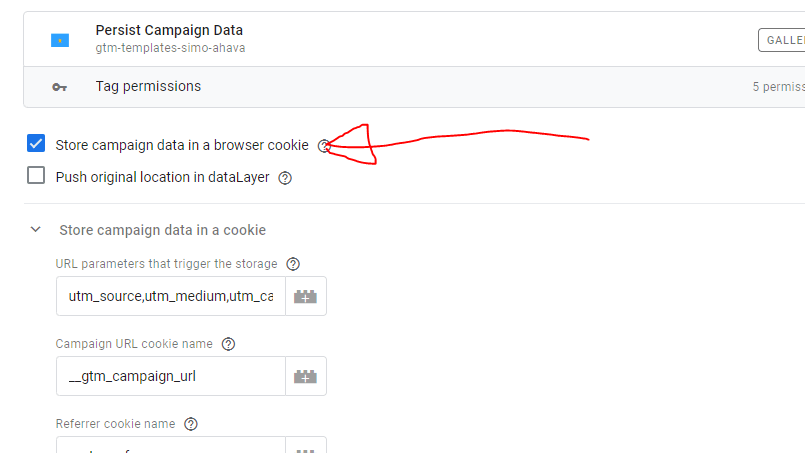
To convert the UTM parameters into a cookie, we are going to be using a community made tag configuration. Create a new tag in Google Tag Manager and then choose a new tag configuration. Click the light blue shaded box that says “Discover more tag types in the Community Template Gallery” and search for the tag configurator “Persist Campaign Data”. Make sure to check the box that reads “Store campaign data in a browser cookie”. Set this to fire on all Page URL’s that contain your expected UTM Parameters.


Step 4: Convert The Cookie Into A URI Decoded Variable
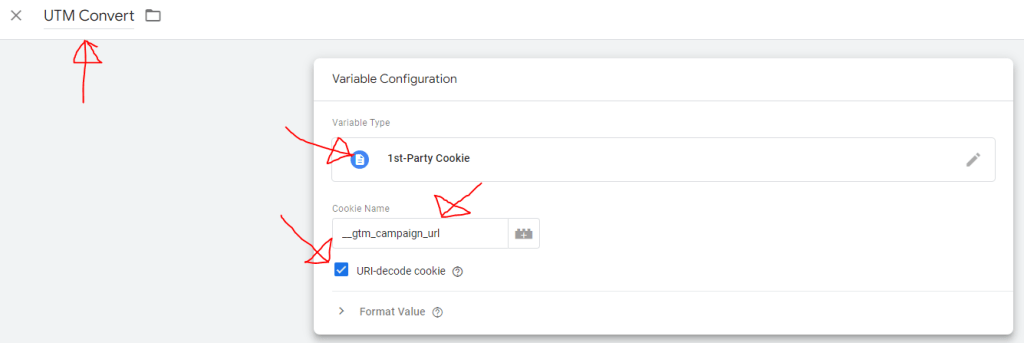
As of right now the cookie that is capturing the UTM parameters isn’t URI decoded. We are going to make a variable in Google Tag Manager that URI decodes the cookie and so we can reference it later on for when we implement the custom HTML code. Simply navigate to your variables tab in Google Tag Manager and create a new 1st-Party Cookie variable. We are going to name this 1st-Party Cookie variable “UTM Convert” for the sake of the code provided in the next step. Simply select the “1st-Party Cookie” as your variable configuration and follow the steps taken in the photo to complete this step.

Step 5: Placing The UTM Into The Form Field
For the final step. We want to create another tag to implement some custom HTML code into our website with Google Tag Manager. To do this, simply create a new tag and select the “Custom HTML” tag configuration. Then paste this code into the HTML box.
<script>
(function () {
  var utmConvert = "{{UTM Convert}}";
  var gclidField = document.querySelector("input[id='form-field-#YOUR FORM FIELD LABEL/ID GOES HERE#']");

  if (gclidField && utmConvert) {
    var gclidValue = getParameterFromUrl(utmConvert, "gclid");
    if (gclidValue) {
      gclidField.value = gclidValue;
    }
  }
})();

function getParameterFromUrl(url, parameterName) {
  var queryString = url.split("?")[1];
  var searchParams = new URLSearchParams(queryString);
  return searchParams.get(parameterName);
}
</script>
We want to set the trigger for this as a “Page View – DOM Ready” event so that the code will run when the website becomes interactive.

The outcome of this step should look like the photo below.

You can change the code to add more parameters if you would like, as stated earlier. I am only going to be demonstrating with one parameter “gclid”.
Conclusion
In this blog post. We covered how to input UTM parameters from a cookie into an Elementor form field using Google Tag Manager. To test to make sure this works. Open up your website in a new incognito window and input some UTM’s at the end of your URL. This can be any string of UTM’s (https://yourwebsite.com/?gclid=test) Then submit your form you made with the hidden field.
If this is something you are looking to implement for your marketing strategy. Please feel free to contact us at Marion Management and book a FREE consultation meeting with our experts.


